segunda-feira, 1 de dezembro de 2014

Instalando Ubuntu 14.04 "along" Windows 8

A ideia básica neste post é colecionar os passos básicos e dicas para instalar o Linux Ubuntu convivendo com o W8 usando um dual boot.

O guia básico está em: http://www.everydaylinuxuser.com/2014/05/install-ubuntu-1404-alongside-windows.html

Dica: No W8 para ir ao "recovery" é necessário seguir pelo painel de controle.


Selecionar "Recuperação" no canto inferior esquerdo.

A opção que indica o guia não aparece "clicável", segui em frente de qualquer forma.


Usei o Pen Drive de 16Gb.

Baixei o Ubuntu 32 bit < 2GB pois entendi que meu desktop não iria aguentar a versão 64bits.
Queimei um DVD com a imagem ISO do Ubuntu pois bootar do Pendrive como indicava o guia não funcionou no meu desktop. Para efeito de instalação dá na mesma usar o DVD ou o Pendrive bootando pela USB.

O particionamento do W8 não funcionou, após >2h de tentativas e erros apliquei a receita do link abaixo para dar uma limpeza no sistema que ajudou muito e instalei um freeware para fazer o "shrink" da partição, EaseUS Partition Master 10.2.

Na tentativa de particionar o drive usando o windows cai neste post que me ajudou a dar uma bela limpada no W8, pode ser útil mas não é essencial para instalar o Ubuntu:

http://ubuntuforums.org/showthread.php?t=2087466

Lembrar de reativar a paginação de memória do W8.

Os passos do guide acima não funcionaram bem para o boot-repair que "acerta" o boot de forma a ficar "dual". Usei os comandos indicados no link abaixo:

https://help.ubuntu.com/community/Boot-Repair

Após reiniciar o PC a opcao dual boot se mostrou presente e funcionando!

Ubuntu ou W8... Mereco uma cerveja...


segunda-feira, 14 de abril de 2014

Salvando a posição dos "icones" Desktop no windows 7 para posterior recuperação!

(Thanks to Winhelponlineblog!)
Receita abaixo, boa sorte! (Deixei os arquivos que indica o link abaixo no Google Drive para posterior uso)
When testing various display resolutions or after completing a remote desktop session, the desktop icons may go out of order. Another case is that when you accidentally use the CTRL+ Scroll button (mouse) on your Windows Vista desktop, the Desktop icon size changes. But reverting back to the original icon size does not restore the custom icon positions on your desktop. In these cases, you need to revert back the custom icon positions manually.
The Layout.dll shell extension from Microsoft Windows NT Resource Kit tools, can be used to Save and Restore Desktop icon layout. Good news is that the extension works well under Windows 2000, Windows XP and even in Windows Vista.
Installing the Layout.dll shell extension
  • To add the shell extension, download layout.zip and save it to a folder.
  • Unzip the archive and extract the files to your Desktop.
  • Move the file LAYOUT.DLL to the Windows\System32 folder.
  • Right-click LAYOUT.REG and choose Merge. Click Yes when asked for confirmation.
Note: Store the file layout.zip in a safe location if you need to uninstall the shell extension at a later time. You may use the file Uninstall.reg (included in layout.zip) to remove the entries from right-click menu.
Saving and Restoring desktop icon layout
After installing the shell extension, you’ll see two context-menu options namely Save Desktop Icon Layout and Restore Desktop Icon Layout when you right-click on an empty area on the Desktop. (Tip for advanced users: You can implement the shell extension in My Computer or Folder context menu as well.)
When you click Save Desktop Icon Layout, the Desktop icon positions are saved to a binary registry value, and you see the following message box:

Fig 1: Saving the desktop icon layout

Fig 2: Restoring the desktop icon layout
Uninstalling the Layout.dll shell extension
To uninstall the Layout.dll shell extension, right-click the file Uninstall.reg (available in layout.zip) and choose Merge. Then manually delete the file LAYOUT.DLL from your Windows\System32 folder.
Editor’s note: I noticed a small glitch in this extension. When two files of the same name are present on the Desktop (one in the per-user Desktop and another file with the same name, from the All Users Desktop folder), the shell extension overlaps the two icons that have the same name, and leaves a blank space before the icon. Therefore, rename one of those two files if you can, when using the Layout.dll shell extension. As Windows Vista shows two desktop.ini files on the Desktop, you’ll need to hide them or delete one of those desktop.inifiles in order for the Layout.dll shell extension to work perfectly.

quarta-feira, 10 de julho de 2013

Instalando office 2010

Passos básicos:

Premissas:

1. Windows 8 instalado e funcionando bem, não necessariamente ativado.
2. Se W7 ou anterior instalar o daemon tools (daemon347.exe)
3. Imagem ISO do office 2010 no HD externo ou interno, "Microsoft Office 2010 Combined Edition X86 32bit.iso"

Passos:

1. No W8 "montar" imagem ISO do office clicando o botão da direita do mouse sobre o ISO.
2. Selecionar office e seguir em frente. Pode-se desativar módulos em Custom.
3. Não optar por armazenamento "online".
4. Rebootar.
5. Rodar o Office2010-SP1 a partir do diretório Office2010-SP1 que deve estar disponível na mesma pasta do Office 2010.
6. Optar por adicionar mais recursos e selecionar Português se perguntar.
7. Rodar novamente o Office2010-SP1, selecionar Toolkit (Crack)
8. O .NET já deve estar instalado, ir direto para o Toolkit.
9. Acionar EZ


sexta-feira, 14 de dezembro de 2012

Perdeu o arquivo que trabalhou aberto de anexo de email?

Eventualmente pode-se abrir um anexo de email, planilha excel por exemplo, começar a editar e não fazer um "Save As", ou seja, apenas acionou o "Save". Esta não é a ação recomendada mas pode acontecer.

No "Outro" dia se você estiver desesperado buscando o arquivo, procure em:

C:\Users\alexandre.alves\AppData\Local\Microsoft\Windows\Temporary Internet Files\Content.Outlook\

Vai existir uma pasta \OBYW4DK7\ ou algo parecido e dentro dela os arquivos temporários.

Atenção: Válido para W7 e Outlook 2007; é necessário "digitar" o caminho e estar com a opção de pastas ocultas liberada para visualização destas.


sexta-feira, 27 de julho de 2012

Alteração em massa prefixo Tel no Outlook

(nova revisão incluindo Macro que insere o "9" para celulares em SP, atualizado em 16/08/2012 com simplificação do uso, apenas 2 macros)

Recentemente a Claro, sem aviso prévio, bloqueou o uso de prefixo + para efetuar ligações em sua rede. Entendo ser um padrão internacional e a Claro não está sendo inteligente em fazer isso. Para mim era uma "mão na roda" pois cadastro meus contatos com +55 XX YYY YYYY assim quando viajo para o exterior não preciso alterar nada. Deve ser um parto também para os estrangeiros que vem para o Brasil...

Neste post apresentam-se 2 Macros VBA que alteram em massa, todos os telefones de todos os contatos da pasta selecionada, apenas modifiquei um Macro existente na Internet que fazia algo similar.

  • Macro "Add9toSPPhones" adiciona o digito "9" nos telefones celulares com prefixo "11"
  • Macro "ChangeP55x021" troca +55 por 021 no inicio de todos os telefones

Testei no meu Outlook 2003 que tinha mais de 700 contatos e funcionou bem. O Macro não altera telefones com outros prefixos, como +52, +1, etc.

(Thanks to Diane Poremsky who wrote the original code.)

Instruções de Instalação:

  1. No Outlook entre no Menu "Tools>Macro>Visual Basic Editor", o Editor de Macros vai abrir.
  2. Clique com o botão da direita do Mouse sobre "Project1" na árvore de projetos e selecione "Insert>Module". Uma pasta "Modules" com um container "Module1" serão criados.
  3. Copie e cole o código fonte abaixo, neste post, para dentro do "Module1".
  4. Salve o projeto, Menu "File>Save" ou aperte o botão Save.
 Uso do Macro +55 para 021:
  1.  Ir para Contatos e Selecionar o grupo de contatos desejado, normalmente o "Contacts", mas eu criei um grupo "Teste" e movi para este alguns contatos, não todos, desta forma pode-se testar o Macro.
  2. Com o grupo de contatos selecionado tecle Alt-F8 e a tela de Macros vai surgir. 
  3. Selecione o Macro "ChangeP55x021" Pressione "Run". Ver figura abaixo.
  4. A alteração em massa não deve demorar, para 700 contatos tomou uns 30 segundos.
  5. Verifique os contatos, todos os +55 devem ter sido substituidos por 021.
  6. Se quiser voltar de 021 para +55 basta inverter estes dados na subrotina "ReplacePrefix" no código fonte.
 Uso do Macro insere algarismo "9" nos celulares da regiao 11:
  1. Ir para Contatos e Selecionar o grupo de contatos desejado, normalmente o "Contacts", mas eu criei um grupo "Teste" e movi para este alguns contatos, não todos, desta forma pode-se testar o Macro.
  2. Com o grupo de contatos selecionado tecle Alt-F8 e a tela de Macros vai surgir. 
  3. Selecione o Macro "Add9toSPPhones" Pressione "Run"
  4. Este Macro não altera qualquer digito antes do prefixo "11"

Abraços
Alex


=====================Código Fonte============================

Sub Add9toSPPhones()

Dim Counter As Integer

'Alexandre Magno 2012
'Add "9" in front of the 8th digit in the mobile # preceded by "11"
'does not change any other digit before "11" if exist

'Cleaning up non numeric characters from all contact numbers
Counter = CleanPhone()
Counter = FixPhone9Format()
MsgBox "Contatos Processados: " & Counter, vbInformation


End Sub
Private Function FixPhone9Format() As Integer

 
Dim oFolder As MAPIFolder
 Set oFolder = Application.ActiveExplorer.CurrentFolder
 
' Confirm it's a contacts folder by looking at the default form name
' to see if it begins with "ipm.contact".
' This allows it to work on folders with custom forms
 If Left(UCase(oFolder.DefaultMessageClass), 11) <> "IPM.CONTACT" Then
 MsgBox "Selecione uma pasta de contatos...", vbExclamation
 Exit Function
 End If
 
Dim nCounter As Integer
 nCounter = 0
 
'MagnoForm.Show
 
Dim oItem
 For Each oItem In oFolder.Items
 Dim oContact As ContactItem
 
' If the current item is a not a Contact Group process the phone numbers
' If it's a DL, the code moves on to the next item
 If TypeName(oItem) <> "DistListItem" Then
 
 Set oContact = oItem
 With oContact
 '.AssistantTelephoneNumber = ReplacePrefix(.AssistantTelephoneNumber)
 '.Business2TelephoneNumber = ReplacePrefix(.Business2TelephoneNumber)
 '.BusinessFaxNumber = ReplacePrefix(.BusinessFaxNumber)
 '.BusinessTelephoneNumber = ReplacePrefix(.BusinessTelephoneNumber)
 '.CallbackTelephoneNumber = ReplacePrefix(.CallbackTelephoneNumber)
 '.CarTelephoneNumber = ReplacePrefix(.CarTelephoneNumber)
 '.CompanyMainTelephoneNumber = ReplacePrefix(.CompanyMainTelephoneNumber)
 '.Home2TelephoneNumber = ReplacePrefix(.Home2TelephoneNumber)
 '.HomeFaxNumber = ReplacePrefix(.HomeFaxNumber)
 '.HomeTelephoneNumber = ReplacePrefix(.HomeTelephoneNumber)
 '.ISDNNumber = ReplacePrefix(.ISDNNumber)
 .MobileTelephoneNumber = Replace9Prefix(.MobileTelephoneNumber)
 '.OtherFaxNumber = ReplacePrefix(.OtherFaxNumber)
 '.OtherTelephoneNumber = ReplacePrefix(.OtherTelephoneNumber)
 '.PagerNumber = ReplacePrefix(.PagerNumber)
 '.PrimaryTelephoneNumber = ReplacePrefix(.PrimaryTelephoneNumber)
 '.RadioTelephoneNumber = ReplacePrefix(.RadioTelephoneNumber)
 '.TelexNumber = ReplacePrefix(.TelexNumber)
 '.TTYTDDTelephoneNumber = ReplacePrefix(.TTYTDDTelephoneNumber)
 
.Save
 
 'MagnoForm.TextBox1.Text = nCounter
 'MsgBox "Contato Processado=" & nCounter, vbInformation
 
nCounter = nCounter + 1
 End With
 End If
 Next
 
FixPhone9Format = nCounter

End Function


Private Function CleanPhone() As Integer
 
Dim oFolder As MAPIFolder
 Set oFolder = Application.ActiveExplorer.CurrentFolder
 
' Confirm it's a contacts folder by looking at the default form name
' to see if it begins with "ipm.contact".
' This allows it to work on folders with custom forms
 If Left(UCase(oFolder.DefaultMessageClass), 11) <> "IPM.CONTACT" Then
 MsgBox "Selecione uma pasta de contatos...", vbExclamation
 Exit Function
 End If
 
Dim nCounter As Integer
 nCounter = 0
 
'MagnoForm.Show
 
Dim oItem
 For Each oItem In oFolder.Items
 Dim oContact As ContactItem
 
' If the current item is a not a Contact Group process the phone numbers
' If it's a DL, the code moves on to the next item
 If TypeName(oItem) <> "DistListItem" Then
 
 Set oContact = oItem
 With oContact
 .AssistantTelephoneNumber = CleanNumber(.AssistantTelephoneNumber)
 .Business2TelephoneNumber = CleanNumber(.Business2TelephoneNumber)
 .BusinessFaxNumber = CleanNumber(.BusinessFaxNumber)
 .BusinessTelephoneNumber = CleanNumber(.BusinessTelephoneNumber)
 .CallbackTelephoneNumber = CleanNumber(.CallbackTelephoneNumber)
 .CarTelephoneNumber = CleanNumber(.CarTelephoneNumber)
 .CompanyMainTelephoneNumber = CleanNumber(.CompanyMainTelephoneNumber)
 .Home2TelephoneNumber = CleanNumber(.Home2TelephoneNumber)
 .HomeFaxNumber = CleanNumber(.HomeFaxNumber)
 .HomeTelephoneNumber = CleanNumber(.HomeTelephoneNumber)
 .ISDNNumber = CleanNumber(.ISDNNumber)
 .MobileTelephoneNumber = CleanNumber(.MobileTelephoneNumber)
 .OtherFaxNumber = CleanNumber(.OtherFaxNumber)
 .OtherTelephoneNumber = CleanNumber(.OtherTelephoneNumber)
 .PagerNumber = CleanNumber(.PagerNumber)
 .PrimaryTelephoneNumber = CleanNumber(.PrimaryTelephoneNumber)
 .RadioTelephoneNumber = CleanNumber(.RadioTelephoneNumber)
 .TelexNumber = CleanNumber(.TelexNumber)
 .TTYTDDTelephoneNumber = CleanNumber(.TTYTDDTelephoneNumber)
 
.Save
 
 'MagnoForm.TextBox1.Text = nCounter
 'MsgBox "Contato Processado=" & nCounter, vbInformation
 
nCounter = nCounter + 1
 End With
 End If
 Next
 
CleanPhone = nCounter

End Function

Private Function Replace9Prefix(strPhone As String) As String
 'originalmente FixFormat, modificado para ReplacePrefix by Magno 2012
 strPhone = Trim(strPhone)
 Replace9Prefix = strPhone
 If strPhone = "" Then Exit Function
 If Len(strPhone) < 10 Then Exit Function ' no change in # with no area code or small #
 
 Dim the9Digit, the10Digit As String
 
 the9Digit = Right(strPhone, 9) 'get mobile # + 1 char
 the9Digit = Left(the9Digit, 1) 'get the 9th digit
 If the9Digit <> "1" Then Exit Function
 
 the10Digit = Right(strPhone, 10) 'get mobile # + 1 char
 the10Digit = Left(the10Digit, 1) 'get the 10th digit
 If the10Digit <> "1" Then Exit Function
 
 strPhone = Left(strPhone, Len(strPhone) - 8) + "9" + Right(strPhone, 8)
 
 
 'MsgBox "telefone=" & strPhone
 
' After replace the country code, we remove non-numeric characters
' Can be tweaked to change formatting, ie: change 202.555.1212 to 202-555-1212
 
 strPhone = Replace(strPhone, "(", "")
 strPhone = Replace(strPhone, ")", "")
 strPhone = Replace(strPhone, ".", "")
 strPhone = Replace(strPhone, " ", "")
 strPhone = Replace(strPhone, "-", "")
 
Replace9Prefix = strPhone
 
End Function

Sub ChangeP55x021()
 
Dim oFolder As MAPIFolder
 Set oFolder = Application.ActiveExplorer.CurrentFolder
 
' Confirm it's a contacts folder by looking at the default form name
' to see if it begins with "ipm.contact".
' This allows it to work on folders with custom forms
 If Left(UCase(oFolder.DefaultMessageClass), 11) <> "IPM.CONTACT" Then
 MsgBox "Selecione uma pasta de contatos...", vbExclamation
 Exit Sub
 End If
 
Dim nCounter As Integer
 nCounter = 0
 
'MagnoForm.Show
 
Dim oItem
 For Each oItem In oFolder.Items
 Dim oContact As ContactItem
 
' If the current item is a not a Contact Group process the phone numbers
' If it's a DL, the code moves on to the next item
 If TypeName(oItem) <> "DistListItem" Then
 
 Set oContact = oItem
 With oContact
 .AssistantTelephoneNumber = ReplacePrefix(.AssistantTelephoneNumber)
 .Business2TelephoneNumber = ReplacePrefix(.Business2TelephoneNumber)
 .BusinessFaxNumber = ReplacePrefix(.BusinessFaxNumber)
 .BusinessTelephoneNumber = ReplacePrefix(.BusinessTelephoneNumber)
 .CallbackTelephoneNumber = ReplacePrefix(.CallbackTelephoneNumber)
 .CarTelephoneNumber = ReplacePrefix(.CarTelephoneNumber)
 .CompanyMainTelephoneNumber = ReplacePrefix(.CompanyMainTelephoneNumber)
 .Home2TelephoneNumber = ReplacePrefix(.Home2TelephoneNumber)
 .HomeFaxNumber = ReplacePrefix(.HomeFaxNumber)
 .HomeTelephoneNumber = ReplacePrefix(.HomeTelephoneNumber)
 .ISDNNumber = ReplacePrefix(.ISDNNumber)
 .MobileTelephoneNumber = ReplacePrefix(.MobileTelephoneNumber)
 .OtherFaxNumber = ReplacePrefix(.OtherFaxNumber)
 .OtherTelephoneNumber = ReplacePrefix(.OtherTelephoneNumber)
 .PagerNumber = ReplacePrefix(.PagerNumber)
 .PrimaryTelephoneNumber = ReplacePrefix(.PrimaryTelephoneNumber)
 .RadioTelephoneNumber = ReplacePrefix(.RadioTelephoneNumber)
 .TelexNumber = ReplacePrefix(.TelexNumber)
 .TTYTDDTelephoneNumber = ReplacePrefix(.TTYTDDTelephoneNumber)
 
.Save
 
 'MagnoForm.TextBox1.Text = nCounter
 'MsgBox "Contato Processado=" & nCounter, vbInformation
 
nCounter = nCounter + 1
 End With
 End If
 Next
 
MsgBox "Contatos Processados: " & nCounter, vbInformation
'MagnoForm.Hide

End Sub
 

Private Function CleanNumber(strPhone As String) As String
 'originalmente FixFormat, modificado para ReplacePrefix by Magno 2012
 strPhone = Trim(strPhone)
 CleanNumber = strPhone
 If strPhone = "" Then Exit Function
 
 Dim prefix As String
 prefix = Left(strPhone, 1) 'for future use
 
'Can be tweaked to change formatting, ie: change 202.555.1212 to 202-555-1212
 
 strPhone = Replace(strPhone, "(", "")
 strPhone = Replace(strPhone, ")", "")
 strPhone = Replace(strPhone, ".", "")
 strPhone = Replace(strPhone, " ", "")
 strPhone = Replace(strPhone, "-", "")
 
CleanNumber = strPhone
 
End Function
Private Function ReplacePrefix(strPhone As String) As String
 'originalmente FixFormat, modificado para ReplacePrefix by Magno 2012
 strPhone = Trim(strPhone)
 ReplacePrefix = strPhone
 If strPhone = "" Then Exit Function
 
 Dim prefix As String
 prefix = Left(strPhone, 1) 'for future use
 
 strPhone = Replace(strPhone, "+55", "021", 1)
 
 'MsgBox "telefone=" & strPhone
 
' After replace the country code, we remove non-numeric characters
' Can be tweaked to change formatting, ie: change 202.555.1212 to 202-555-1212
 
 strPhone = Replace(strPhone, "(", "")
 strPhone = Replace(strPhone, ")", "")
 strPhone = Replace(strPhone, ".", "")
 strPhone = Replace(strPhone, " ", "")
 strPhone = Replace(strPhone, "-", "")
 
ReplacePrefix = strPhone
 
End Function

sexta-feira, 8 de junho de 2012

Atualizando Mapas no GPS Garmin

(Esta postagem é para os colegas Jorge, Fred, Erick e Alfeu, por favor não paguem para alguém fazer isso, é divertido e barato fazer você mesmo, mas se o GPS virar um peso de papel não reembolso..srsr)

Os passos abaixo são em base a tutoriais e informações do site: http://www.tracksource.org.br/

Premissas:
  1. Ter um GPS Garmin, tenho o modelo nüvi 255W, mas deve funcionar para os outros modelos.
  2. Ter um cabo USB para ligar o GPS no PC, normalmente o GPS não vem com este cabo, mas é muito comum te-lo em casa por conta de outros dispositivos, MP3, celular. É um cabo USB <> MiniUSB, ver foto. Se não tiver o cabo basta comprar pela internet, custa de 5 a 15 reais.
  3. Ter um PC para baixar os mapas e com porta USB disponível.

Cabo MiniUSB


    Passos:

    1. Ir para a página: http://www.tracksource.org.br/index.php/downloads-mapas.html e clicar na opção "Cartão SD" para download do Mapa Brasil na sua última versão, hoje 12.06. Siga as instruções para Download e coloque o arquivo em uma pasta de sua preferência. É um arquivo grande vai demorar dependendo da sua banda "larga", nome do arquivo "gmapsupp_v1206.zip" para o map 12.06.
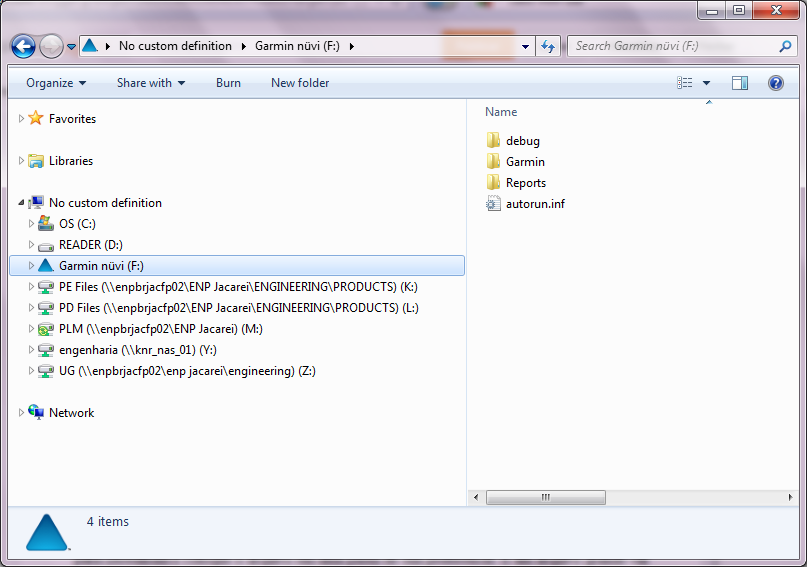
    2. Conectar o GPS no PC com o cabo USB, o GPS apresenta uma barra de status e após ~1 min entre em modo "disco externo" vamos dizer... Ele fica com uma tela escrito "GARMIN". Neste modo o seu PC deve ter montado um "drive" com as pastas e arquivos internos do GPS, use o windows explorer para navegar até o Garmin, ver figura abaixo.

    GPS Garmin no Explorer


    1. Extrair o arquivo "gmapsupp.img" de dentro do zip file "gmapsupp_v1206.zip", para isso utilize o botão da direita do mouse sobre o arquivo e digite a opção "extrair aqui", supondo que você tem o winzip instalado, acho que o Windows vista em diante tb extrai arquivos zip automaticamente. o arquivo .img pode ficar na mesma pasta, isto não é relevante desde que você saiba qual pasta ele está.
    2. Dentro do GPS existe uma pasta "Garmin" e dentro desta está o "gmapsupp.img" original, recomendo que este seja copiado para o PC como backup, se der alguma zica com o novo mapa basta copiar este de volta para o GPS.
    3. Apague o "gmapsupp.img" do GPS.
    4. Copie o novo "gmapsupp.img", versão 12.06 para o GPS, demora pois a memória Flash do GPS é lenta.
    5. Ejete o Drive GPS, no meu PC ficou com letra F.
    6. O GPS deve resetar e rodar normalmente com o novo mapa!

    Observações:

    1. Fazer tudo isso em um notebook é mais seguro pois se acabar a força no meio do processo a bateria do note segura a onda...
    2. O processo para atualizar os POIs, radares e outros pontos de interesse, é basicamente o mesmo, apenas o arquivo e pasta no GPS são outros.
    3. Este procedimento não afeta os favoritos do GPS.


    quinta-feira, 7 de junho de 2012

    HD USB externo "Bootável"

    Passos básicos para tornar um HD externo USB "Bootável" com Windows 7

    Este lembrete é baseado no tutorial #47 do site: http://www.rmprepusb.com/

    Preparação da Máquina hospedeira que será usada para criar o HD externo "bootável", esta é a mesma máquina onde o HD externo vai "bootar" con o Windows 7, para tal instalar:
    • Instalar o "Windows® Automated Installation Kit (AIK) for Windows® 7" baixando o ISO a partir do link http://www.microsoft.com/en-us/download/confirmation.aspx?id=5753 queimando um DVD ou montando o ISO virtualmente.
    • Baixar, descompactar e colocar em uma pasta os arquivos do zip "NT6_Fast_Installer" (clique aqui para baixar).
    • Windows 7 em DVD, será necessário anotar o CD KEY, principalmente se o mesmo estiver escrito no DVD (erro comum..srsrrs). No meu caso tomei o serial key do PC que tinha o mesmo windows via um SW freeware pois tinha perdido o CD KEY. 
    • Instalar o RMprepUSB (clique aqui para baixar).
    • Opcionalmente instalar o Drivermax e fazer um backup dos drivers do PC. Recomendo.

    Passos:
    1. Formatei o HD USB com o RMprepUSB, opção de boot para Windows 7 ativa.
    2. Rodei o Video do tutorial para ajudar.
    3. Rodei o script NT6 Faster Installer. Segui os passos basicos. Levou ~20 min.
    4. No meu caso foi Letra F para o USB. Pode ser G, depende.
    5. Rebootar o PC e alterar a BIOS para bootar 1o pela USB. 
    6. Rebootar o PC com o HD externo conectado. O novo windows vai bootar, seguir os passos. Vai bootar uma segunda vez.
    7. O video, mouse e teclado devem ser reconhecidos automaticamente mas outros hardwares como wifi, som, etc pode ser problema, ai entra o Drivermax. Neste caso rebootar o PC pelo seu próprio windows e transferir os drivers "coletados" para o HD Externo.
    8. Rebootar usando o Windows do HD externo e atulizar os drivers pelo painel de controle "sistema". Outra alternativa é buscar os drivers na internet ou usar os CDs do fabricante, no meu caso nao dava pois nao guardei nada disso... rsrs
    Feito!